- Published on
Installing a KMS activation server - vlmcsd
- Authors

- Name
- George Lekiashvili
- @lekiashvili_dev
Disclaimer: This article is provided for educational and informational purposes only. In a real project, you need to use official activation methods from Microsoft. The author of the article condemns the use of unlicensed software in any form.
Let's continue. You might be familiar with the KMS emulator program that runs as an exe file on workstations. This is, to put it mildly, not safe, as evidenced by antivirus blocking this program (any unofficial exe program with closed source code is unsafe). Today we will learn how to activate any device on the network in a very simple way.
On GitHub, there is an open-source project that allows you to run a KMS emulator within a network. Essentially, it is a KMS server emulator, originally created to activate multiple devices within a large network.
The project is called vlmcsd (https://github.com/Wind4/vlmcsd) and it allows you to install a KMS server not on Windows, but on Linux (or any other OS), thus significantly saving computational resources.
In this article, I will tell you how to install this KMS server as a Docker container, and also how to set up automatic activation of Windows Server, Windows, and Microsoft Office, and forget about the need for manual activation for a long time.
1. Installing Docker
If you already have Docker installed, you can skip to step 2.
Assume you already have a Linux server installed. In our example, we use Ubuntu 22.04 (LTS), but you can install Docker on any other OS.
Official installation instructions: https://docs.docker.com/engine/install/
Installing Docker on Ubuntu
Install the official Docker GPG key:
sudo apt-get update
sudo apt-get install ca-certificates curl gnupg
sudo install -m 0755 -d /etc/apt/keyrings
curl -fsSL https://download.docker.com/linux/ubuntu/gpg | sudo gpg --dearmor -o /etc/apt/keyrings/docker.gpg
sudo chmod a+r /etc/apt/keyrings/docker.gpg
Add the repository and update:
echo \
 "deb [arch="$(dpkg --print-architecture)" signed-by=/etc/apt/keyrings/docker.gpg] https://download.docker.com/linux/ubuntu \
 "$(. /etc/os-release && echo "$VERSION_CODENAME")" stable" | \
 sudo tee /etc/apt/sources.list.d/docker.list > /dev/null
sudo apt-get update
Install Docker:
sudo apt-get install docker-ce docker-ce-cli containerd.io docker-buildx-plugin docker-compose-plugin
Install docker-compose version v2.27.1 (check for the current version) from the official website: https://github.com/docker/compose/releases
sudo curl -L "https://github.com/docker/compose/releases/download/v2.27.1/docker-compose-$(uname -s)-$(uname -m)" -o /usr/local/bin/docker-compose
Set permissions:
sudo chmod +x /usr/local/bin/docker-compose
Check the installation success with the command (shows the installed version):
docker-compose --version
Running without sudo
To run containers without the sudo command, add your user to the docker group:
Create the group if it doesn't exist:
sudo groupadd docker
Add yourself:
sudo gpasswd -a ${USER} docker
Restart the Docker service:
sudo service docker restart
Update the group to avoid rebooting the server:
newgrp docker
This completes the Docker installation.
2. Running the container
While in your home directory (cd ~), clone the project:
git clone https://github.com/Wind4/vlmcsd-docker.git vlmcsd
Enter the directory:
cd vlmcsd
Start the container using docker-compose:
docker-compose up -d
Check if the container is running with the command:
docker-compose ps
3. Configuring ports
By default, the vlmcsd program operates on the standard KMS port — TCP/1688. Docker forwards the necessary port, but if you have a firewall on the network, you need to allow access from the networks with devices (servers and workstations) to the Docker server.
4. Adding a DNS record
To automatically find the KMS server in the domain, add a _VLMCS record to the DNS.
The easiest way to do this is using the PowerShell command (you need to run this command on your AD DNS server):
Add-DnsServerResourceRecord -Srv -Name "_VLMCS._tcp" -ZoneName "corp.contoso.com" -DomainName "10.10.3.11" -Priority 0 -Weight 0 -Port 1688
Where corp.contoso.com is your AD zone domain,
and 10.10.3.11 is the IP address of the Docker server with the KMS container.
5. Activating Windows
Now all devices in the domain with Windows and Office will automatically activate on the KMS server if they have GVLK keys (VL version of Windows, or with a KMS key installed).
When installing Windows, use the KMS keys from the official site: https://learn.microsoft.com/en-us/windows-server/get-started/kms-client-activation-keys
If you need to activate Windows manually, use the following PowerShell commands:
Set the key (if not already set), for example, the KMS key for Windows Server 2022 Standard:
slmgr.vbs -ipk VDYBN-27WPP-V4HQT-9VMD4-VMK7H
Activate:
slmgr.vbs -skms 10.10.3.11
slmgr.vbs -ato
After running the command, you should see Product activated successfully
Check Windows activation with the command:
slmgr.vbs -dlv
Errors may occur if you have incorrect versions of Windows installed. If you have any questions, ask them in the comments.
If the activation is successful, you will see the following message:
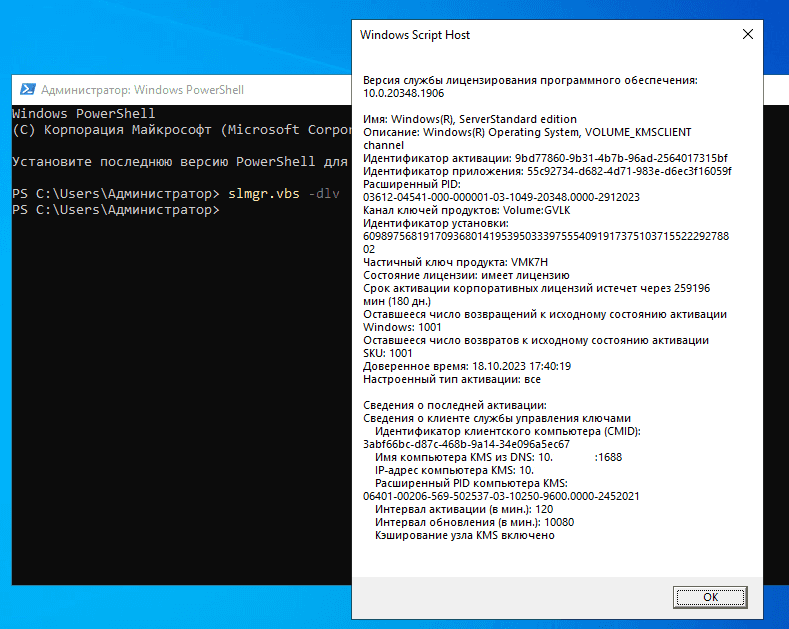
Message about the successful activation of Windows Server 2022 Standard.
6. Activating Office
Similarly, Microsoft Office 2022/2019/2016/2013 is activated. To activate, use the following commands:
Navigate to the Office folder:
cd C:\Program Files\Microsoft Office\Office16
Activation:
cscript ospp.vbs /sethst: 10.10.3.11
cscript ospp.vbs /act
Check the activation status:
cscript ospp.vbs /dstatusall
That's it. The longest part is installing Docker. If you already have Docker and port 1688 is available, setting it up will take 5–10 minutes.